

Steel Building Design for Lower Energy Use
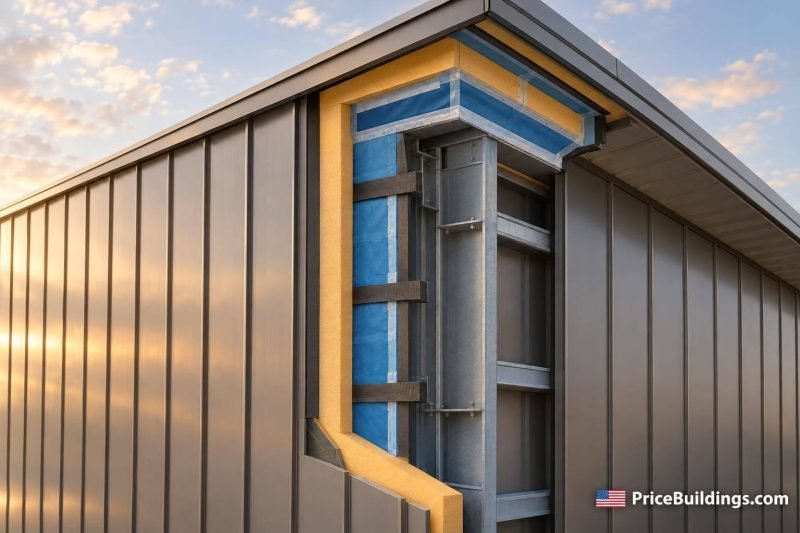
To lower energy use in a steel building, I start with insulation, thermal breaks, and air sealing – not the steel itself. Thermal bridging can cut an assembly’s effective insulation performance by 20% to 70%, so I check the installed roof and walls, not just the listed R-value.
My design checklist covers:
- Building use and climate: Set heating and cooling needs, operating hours, and local code requirements.
- Insulation and moisture: Keep insulation continuous, seal joints, and choose air and vapor controls for the assembly.
- Roof finish and ventilation: Limit solar heat gain and match airflow, exhaust, and makeup air to the space.
- Daylight, doors, and layout: Reduce lighting demand, seal large openings, and separate conditioned rooms from loading areas.
- Quotes and compliance: Compare the same specifications and confirm installation scope and engineering documents.
My rule: plan these parts together, then <u>check the complete design and estimate your project costs before ordering</u>.
Energy Code Compliance for Metal Building Systems Part 1
Insulation, Wall Panels, and Air Sealing
Steel Building Insulation: Compare the Complete Assembly
Choose Roof and Wall Insulation
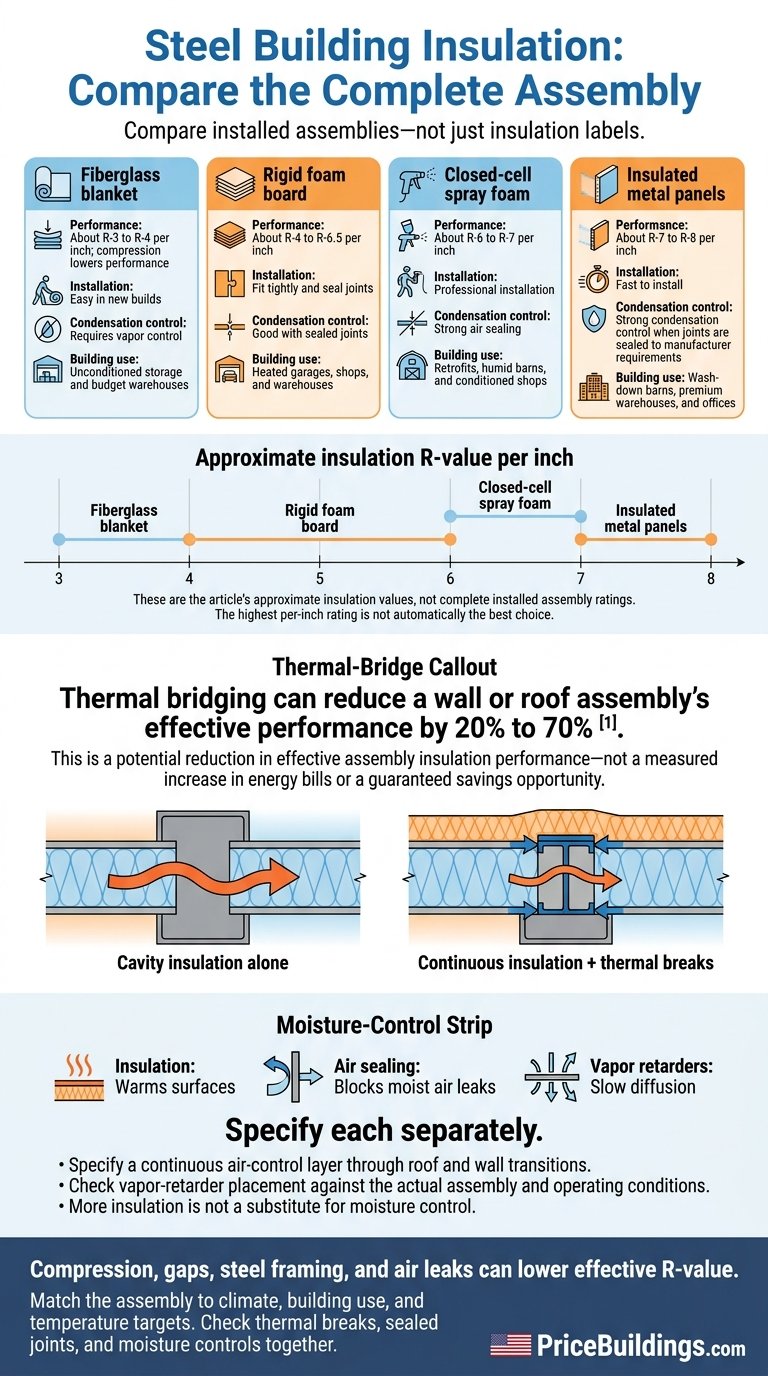
With climate priorities set, choose an enclosure that keeps indoor temperatures on target. Compare installed assemblies, not just insulation labels. Compression, gaps, steel framing, and air leaks can lower effective R-value.
Match the assembly to the climate, building use, and temperature targets. Rigid board provides continuous insulation when installed outside the framing. These choices help reduce winter heat loss and summer heat gain.
| System | Performance | Installation | Condensation control | Building use |
|---|---|---|---|---|
| Fiberglass blanket | About R-3 to R-4 per inch; compression lowers performance | Easy in new builds | Requires vapor control | Unconditioned storage and budget warehouses |
| Rigid foam board | About R-4 to R-6.5 per inch | Fit tightly and seal joints | Good with sealed joints | Heated garages, shops, and warehouses |
| Closed-cell spray foam | About R-6 to R-7 per inch | Professional installation | Strong air sealing | Retrofits, humid barns, and conditioned shops |
| Insulated metal panels | About R-7 to R-8 per inch | Fast to install | Strong condensation control when joints are sealed to manufacturer requirements | Wash-down barns, premium warehouses, and offices |
Limit Thermal Bridges and Seal Joints
Steel framing gives heat a direct path through the enclosure. Continuous insulation interrupts that path, while sealed joints limit air leakage. Thermal bridging can reduce a wall or roof assembly’s effective performance by 20% to 70%.
Cavity insulation alone does not stop heat flow through steel girts and framing. Specify thermal breaks wherever framing or attachments create a bridge.
During installation, seal panel joints, transitions, and penetrations. Use compatible sealants, gaskets, and closures at every joint. With those heat paths addressed, moisture is the next risk to manage.
Prevent Condensation and Manage Moisture
Thermal control depends on moisture control, too. Insulation warms surfaces, air sealing blocks moist air leaks, and vapor retarders slow diffusion. Specify each separately.
Specify a continuous air-control layer through roof and wall transitions. Check vapor-retarder placement against the actual assembly and operating conditions.
For humid or wash-down buildings, design moisture control alongside the insulation package – not after installation. More insulation is not a substitute for moisture control.
Roof Finishes and Ventilation
Choose Roof Finishes for Your Climate
Once insulation is in place, the roof finish offers another way to cut heat gain. Choose by solar reflectance and thermal emittance – not color alone. The finish reduces solar gain, while insulation controls heat flow.
| Climate | Roof finish and assembly | Energy impact |
|---|---|---|
| Hot-humid | Reflective finish with assembly-specific vapor control | Lower cooling demand; small heating tradeoff |
| Mixed | Light colors with a radiant barrier | Moderate cooling savings; balance winter needs |
| Cold | Darker colors with assembly-specific vapor control | Limited cooling savings; possible winter heat gain |
| Dry | Reflective finish with above-sheathing ventilation | Lower cooling demand; small heating tradeoff |
Keep insulation continuous below any vented roof assembly. Use above-sheathing ventilation only when the assembly is designed for it.
Choose Ventilation Methods and Controls
Roof ventilation does not replace ventilation for occupied spaces. Ridge-and-eave vents serve roof cavities or open buildings, not enclosed workspaces.
| Method | Best application | Cooling potential | Moisture and fume effects | Heating losses and controls |
|---|---|---|---|---|
| Ridge-and-eave ventilation | Designed roof cavities; open barns and storage | Passive heat removal | Removes roof-cavity moisture | Low heating losses for separate roof cavities |
| Operable windows | Occupied shops and offices | Depends on weather | May let humid air in | Close and weather-strip |
| Powered exhaust fans | Welding shops, paint areas, livestock barns | Active heat removal | Source-specific exhaust | Interlock with makeup air |
| HRV / ERV | Conditioned shops and warehouses | Controlled air exchange | No unapproved contaminated exhaust | Energy recovery with controls |
Pair inlets and outlets to create one airflow path. Interlock exhaust with makeup air, and close dampers when equipment stops.
Base ventilation controls on outdoor temperature and humidity, not indoor temperature alone. HRV and ERV systems can recover 60% to 95% of exhaust-air energy, depending on the equipment and conditions.
Plan Exhaust for Each Building Use
Place local exhaust at welding and process sources to limit the loss of conditioned air. Match exhaust and makeup air to the building’s use.
Have a professional design hazardous exhaust, combustion safety, makeup air, and recovery systems. Do not send contaminated exhaust through recovery equipment unless it is approved for that use.
With roof ventilation and exhaust set, daylighting and door placement control the remaining load.
Daylighting, Doors, and Interior Layout
Once the shell is insulated and sealed, use the layout and openings to cut lighting demand and heat loss through doors.
Use Daylight While Limiting Heat and Glare
Pair high-wall translucent panels with white liner panels to reduce lighting demand without adding roof penetrations. Specify framed openings when you order so headers, jambs, and insulation details are designed together.
Door placement offers another way to limit energy loss.
Choose and Place Doors to Limit Energy Loss
Compare doors by heat-loss risk, access needs, and sealing requirements. Rolling steel doors work for vehicle and equipment access, but uninsulated versions offer little thermal protection. Insulated sectional overhead doors suit heated or cooled spaces that need large openings.
| Door type | Heat-loss risk and sealing needs | Access use | Conditioned versus unconditioned use |
|---|---|---|---|
| Insulated personnel door | Low; sealed threshold | Frequent foot traffic | Suitable for heated or cooled spaces |
| Rolling steel door | High when uninsulated; brush or bulb seals | Vehicles and large equipment | Uninsulated versions provide little thermal protection |
| Insulated sectional overhead door | Lower when closed; integrated weatherstripping | Vehicles and large equipment | Suits conditioned spaces; frequent opening increases losses |
Size vehicle openings to fit your equipment, and confirm clearances before ordering. Add a separate personnel door so foot traffic doesn’t require opening a large vehicle door.
Separate Conditioned Spaces From Loading Areas
Plan where heated or cooled space ends and unconditioned space begins.
Use insulated partitions to separate heated or cooled rooms from loading areas. Zone lighting and HVAC to match how each space is used.
Conclusion: Check Energy Requirements Before Ordering
Review Your Design Before Ordering
Use the details above to check your final design before placing an order. Confirm the applicable energy code and required compliance documents with your local building department.
Look at the full assembly – not just the insulation R-value. Check thermal breaks, seals, air and vapor control, and installation details.
Request Quotes With Clear Building Specifications
Once the design is set, use the same specifications for every quote request.
Price Buildings offers free quotes for customizable prefabricated steel building kits for garages, barns, shops, warehouses, and other uses. Include dimensions, colors, insulation, doors, windows, vents, location, climate zone, intended use, and conditioning level in each request.
Confirm what the quote includes: materials, services, who handles installation, and which engineering documents support code compliance. Check that the quoted assemblies match your specifications for lower heating and cooling demand.
FAQs
What insulation R-value does my steel building need?
Your insulation R-value depends on your DOE/IECC climate zone and whether the space is heated or cooled. For conditioned steel buildings, Price Buildings recommends these approximate R-values based on MBMA/IECC/ASHRAE guidance:
- Zones 1–3: Walls R-13; roofs R-19+R-11 liner.
- Zones 4–5: Walls R-13+R-13ci; roofs R-19+R-11 liner.
- Zone 6: Walls R-13+R-13ci; roofs R-25+R-11 liner.
- Zones 7–8: Walls R-13+R-13ci; roofs R-30+R-11 liner.
Can I improve an existing steel building’s energy efficiency?
Yes. Retrofitting can make an existing steel building more energy efficient. But it usually takes more labor and costs more than installing the same features during construction.
Options include adding insulation, sealing gaps around doors and windows, applying reflective roof coatings, and installing thermal spacer blocks to reduce metal-to-metal heat transfer. You can also upgrade overhead door seals and use smart controls and LED lighting to help manage energy use.
Which energy upgrades will pay off fastest?
Start with air sealing and roof upgrades for the fastest return. Weatherstripping or gaskets around doors, windows, vents, and joints cut energy loss at a low cost. Better roof insulation and a light-colored, reflective roof finish also reduce the need for summer cooling.
Spray foam costs more upfront, but it often pays for itself in 3–7 years. Plan these upgrades during construction: retrofitting typically costs 30%–60% more.